Google My Business (GMB) account enables businesses to appear in Google search results, improve their Google Map rankings, communicate with customers, and generate more leads.
It has never been more important for a local business to have high exposure to Google. Additionally, it has been estimated that 46% of all Google searches are seeking local information. And that 4 in 5 customers use search engines to obtain local information, implying that if your business is not showing up, one of your competitors is. Stats like these reveal just how crucial a GMB listing is in today’s competitive environment.
At North Star Design Studio, we routinely create Google My Business Accounts for our web development clients. This improves their online visibility as well to set a proper foundation for their future marketing and SEM needs. (We’ve included a complimentary Checklist at the end of this article to help you DIY your GBP!)
GMB can play a very important role in helping potential clients find you. Let me share my personal experience of how GMB helped me choose some great restaurants during my vacation:
When a client asks me, “Is it really important to create a Google account to manage my business?” I ask them to think about their own experiences and how listings impact their purchase decisions every day. Your GMB account is more important than ever. Whether we want to admit it or not, Google is the first place (you and) your customers go to source information about businesses like yours.
Benefits of Google My Business Account
Let’s look at the benefits Google My Business (GMB) offers to local businesses.
- Improved Local Visibility: When you search for anything on Google, it will show you results that are not only relevant to you, but also nearby! Create a Business Google account to rank for local searches and, as a consequence, increase the visibility of your business.
- Competitive Advantage: In the local search environment, an optimized Google My Business page is a ranking factor. Improving your Google My Business page allows you to outrank competitors and get a competitive edge.
- Manage Your Reputation: A GMB account allows business owners to reply to and connect with their existing client base directly. You can reply to reviews (both favorable and bad), answer inquiries, and even allow direct messaging.
#NSDSProTip
Responding promptly to Google reviews can add some serious points to what I like to call your listing’s authority juice. Likewise, taking longer than a day to respond to reviews can subtract authority points. Ideally, you want to respond within 1 to 2 hours. Also, don’t hesitate to drop in optimized keywords/search terms to your response but stay away from hard upsells, it’s best to just be sincere, authentic, and add clarification about the services delivered than to stress about trying to close the deal on future business with the reviewer.
Do I Need to Optimize my GMB Listing?
Which of these two listings would you prefer?
An optimized listing with updated pictures and business information can make a huge difference to your business image. An unclaimed GMB listing with wrong or incomplete business info is like Cinderella’s pumpkin without the magic of the Fairy Godmother (pumpkin= GMB account / Fairy Godmother= Online marketer). If you want to maximize the potential of your GMB account, set it up correctly and optimize it properly.
#NSDSProTip
Adding images to your GMB listing is as simple as drag and drop once the profile is set. A great place to source images is from your own Social Media accounts and from positive client reviews. If both of those wells are empty, grab your smartphone right now and go take a couple of dozen images. As a design studio, I’m fortunate that our work is visual and meant to be shared. I am often able to simply check in on past clients’ SM profiles to see what they’ve been up to and, with their permission, of course, borrow a few images here and there to help promote our own services. You may be able to employ a similar tactic with past satisfied customers. Ex: a salon could reach out to a bride to use wedding photos to promote their bridal party services.
How to Create a Google Business Account from Scratch: A Step-by-Step Procedure
Step 1: Sign in to Google My Business on your computer.
Click “Manage Now” to begin the automated Google Account set-up process.
google business listing image: Stand our on Google with a free Business Profile
After you click ‘manage now’, the next page may prepopulate the last credentials you used to access Google related services. If those are the credentials (email address) you want associated with your GMB account, Click ‘Next’. If not, click ‘Create account’ instead.
#NSDSProTip: Before you get started,
If you already have a Google Analytics account, you’re going to want your Google My Business page to be in the same account. You can do this by logging into your Google Analytics account and then navigating to Google My Business Set-up. See tip 2 for an important note about login credentials.
Before attempting to ‘claim’ your business, be sure you have the right login credentials for the Gmail account you want to connect to your business and that it works. You’ll want to sort out password resets before you start the process of claiming your Google My Business Account. Log out of all Google accounts and then login to the main account you want tied to your GMB listing.
These 2 steps will help ensure you don’t accidentally claim a business listing under someone else’s Google account. We don’t want your company to suddenly become the property of your 4th grader who used your laptop last!
- If you’re creating a new account, you’ll be prompted to create your credentials on the next screen. Once you’ve completed those fields, click ‘Next’.
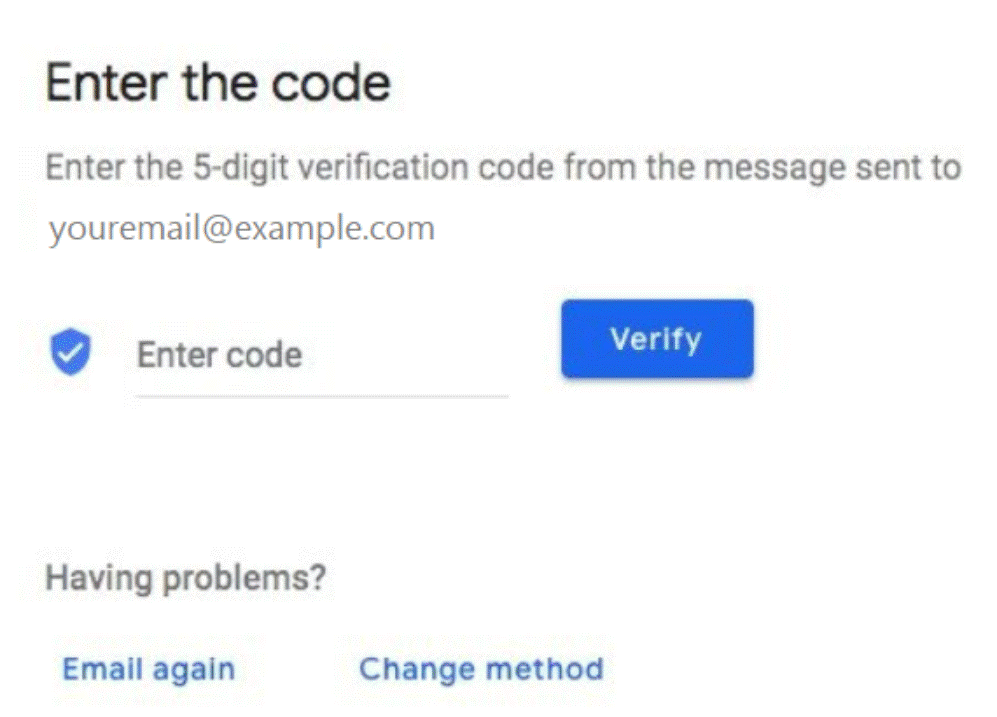
- The next page will provide prompts to add a confirmation code that will have been sent to the email address used on the previous screen. Enter that code and click ‘Verify’.
- Once you’ve verified the email address, you’ll be forwarded to a new screen that asks you to submit some ‘personal’ details. These are used to help validate ownership and assist in account recovery down the road. You can read more about this here. Click Next when you’ve completed this step.
- The next screen asks you to confirm your telephone number in the same way you confirmed your email address. You can skip this part if you like and confirm your telephone number later.
- The next screens will prompt you to agree to Google’s Privacy and Terms. Once you’ve accepted their terms/conditions, your account is all set and you can begin to create your Business’s Profile.
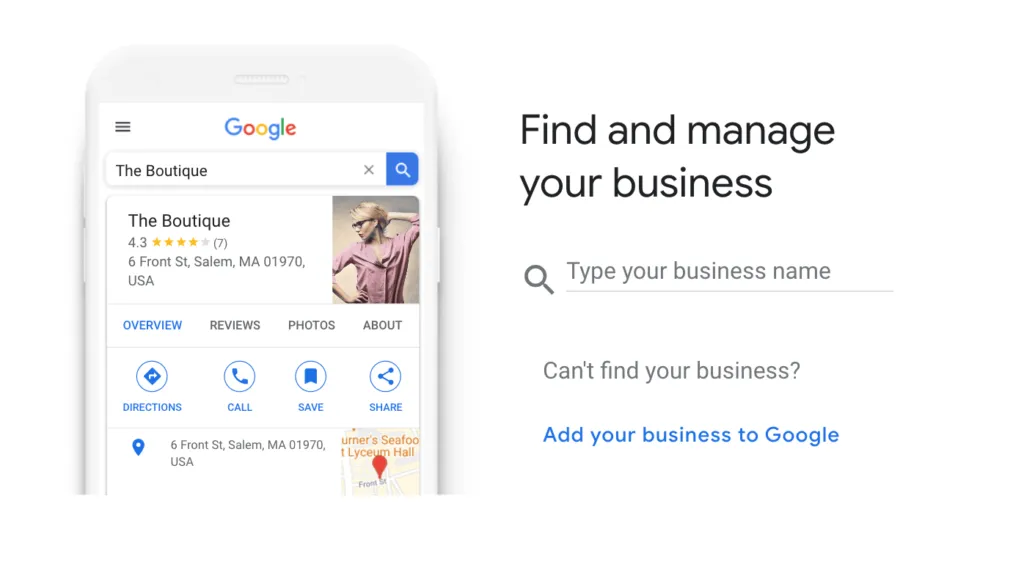
Step 2: Find Your Business or Add Your Business To Google
There’s a chance your business already has a Google Profile. Once your Google Account is created, Google will prompt you to try and search for your business’ profile in case it already exists. This is often the case for established businesses that are more than a couple of years old. It’s much better to Claim the existing page than it is to create a new one. An existing page is likely to already have reviews, photos and key business information populated making it a lot less work to set-up.
For the purposes of this tutorial, we’ll assume you need to ‘add’ your business to Google vs ‘claim’ an existing page.
To begin, click ‘Add your business to Google’ and follow the prompts to build your Business’ Google Profile.
#NSDSProTip
If you receive an on-screen notification indicating that someone else has confirmed your business, request ownership of the Business Profile.
Here’s a step-by-step procedure of doing it:
Click ‘Request Access’ and fill out the form.
Click submit.
The current profile owner will get an email that asks them to contact you.
If your request is approved, you will receive an email and will be able to manage your Business Profile in Google My Business.
If your request is denied, you will be notified via email and can still suggest changes to the profile. You may also be able to appeal the denied request.
If you haven’t heard back after three days, you may be able to claim the profile yourself.
Step 3: Create Your Business Profile
This portion of the set-up process includes several windows that ask key information about your business, do your best to answer those questions as accurately as possible but don’t stress, you can update any of the information later.
#NSDSProTip
You may also be asked to place a marker on a map indicating your business location. If your company does not have a physical location, you can mention the service area instead.
It’s helpful to know what information you’ll be asked to provide ahead of time. Here of questions you’ll be prompted to answer:
Do you want to add a location customers can visit, like a store or office?
Where do you serve your customers? (optional)
What region is your business based in?
What contact details do you want to show to customers?
Want updates and recommendations for your business on Google?
Step 4: Verify “Choose a Verification Method“
In this section, we will discuss different methods of your profile verification. Google guidelines recommend the following 5 standard verification methods:
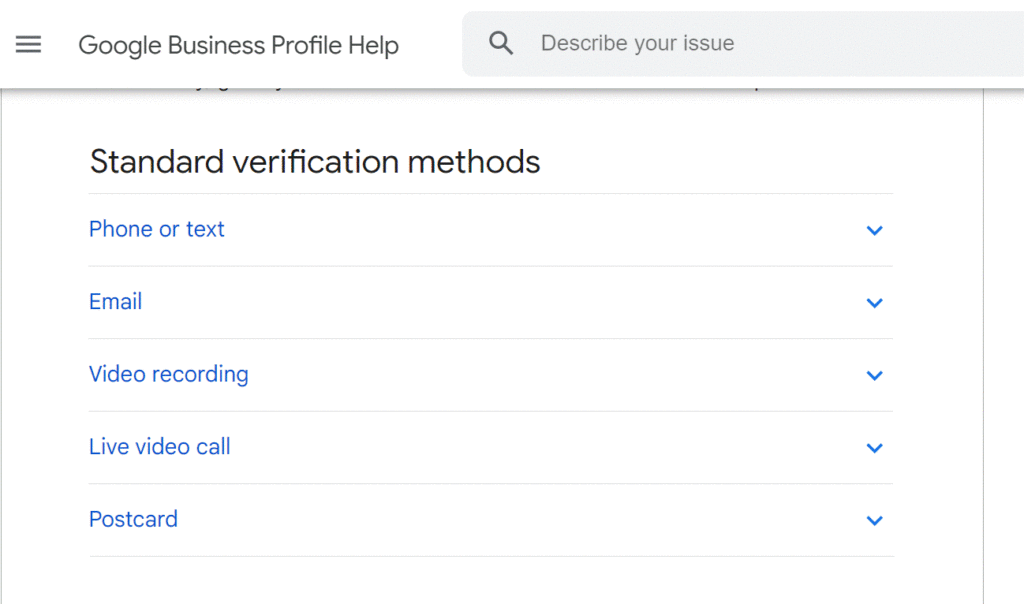
Google decides which way(s) is the best to verify your specific business and recommends it to you. One of the most recently added verification options is through video recording. In the following sections, we will discuss how you could verify your business through video recording. We will also discuss the guidelines to verify through other recommended ways.
1. Verification Through Recorded Video
Video verification is like a digital check in. It is also one of the smartest methods to authenticate a legitimate business and identify the fake listings that can show up on Local Pack, Google Maps or Local Finder.
The video recording can help Google find answers to the following questions:
- Does this business really exist?
- Is the address/location of the business accurate?
- Is it an authentic business?
- Does the merchant have the authority to represent the business?
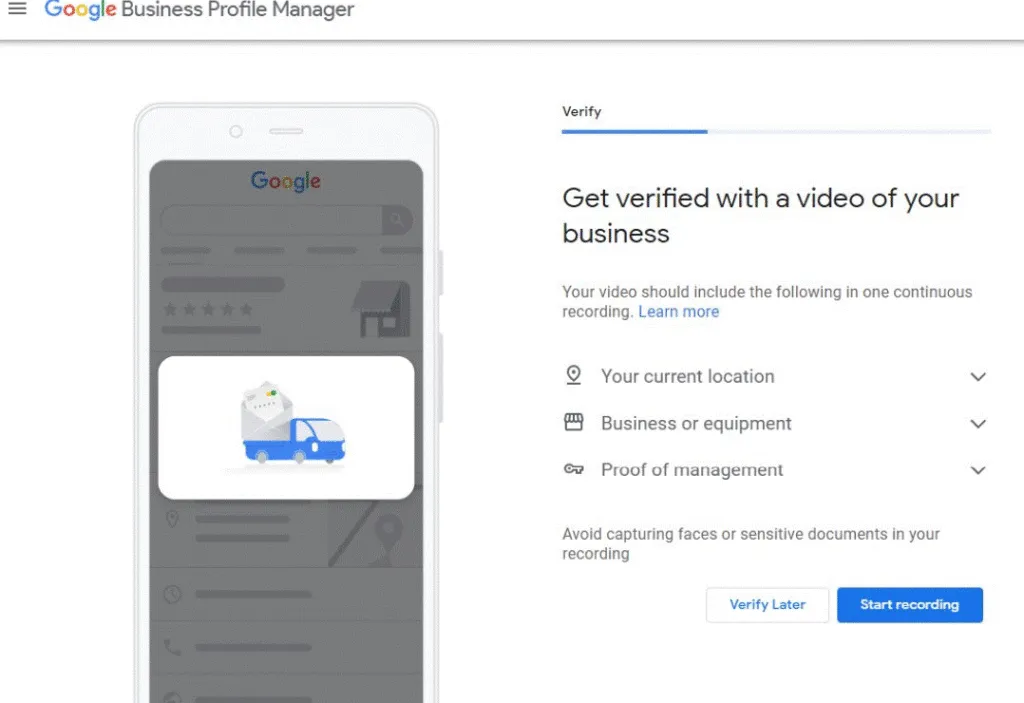
To find answers to the above mentioned question, Google requires that the video recording must satisfy the following requirements to be accepted.
- You can not edit the video. It has to be one consistent piece.
- The video needs to be started from the outside of your business location and show details such as street signs, business logo and address.
- While you are walking into the business, you must showcase some signage or business equipment related to the location. This could be marketing material, branded equipment or other tools.
- Your video should provide proof of your management. It will show that you are authorized to represent your business. This proof of management could include recording areas which are only accessible to the employees e.g. kitchen in a restaurant. This way you can prove that you work at the place and are authorized to represent the business.
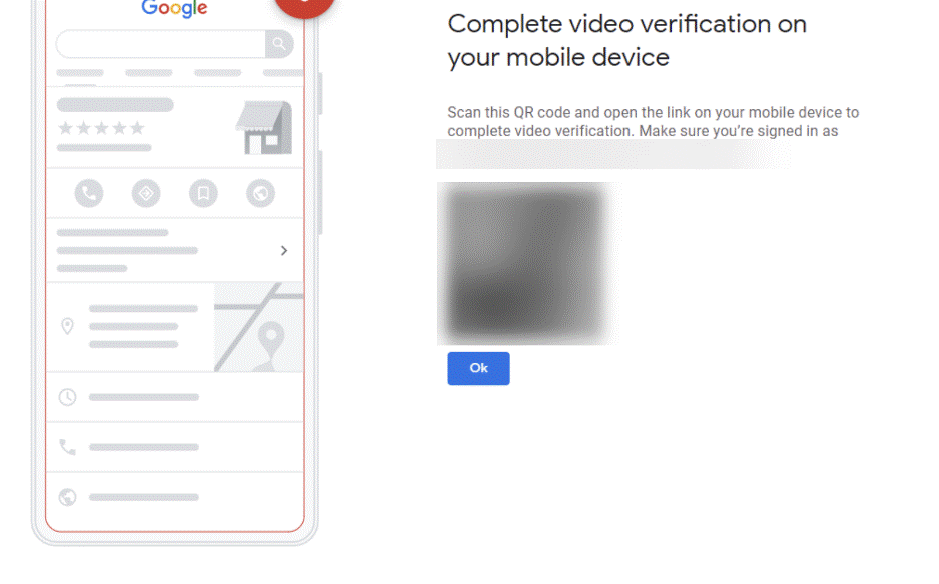
Once you know all the details that should be in the video, go to your Business Profile.
Click Get Verified then Capture Video. The video must be created using the Google Business Profile video verification process. You will see a QR code on your desktop screen that can be scanned with a mobile phone device. This way, the verification process can be continued on your mobile device like a smartphone or a tablet with a camera. Sign in with Google Business Profile on your mobile phone before you scan the code.
- Click Start Recording. Record your video while keeping in mind the above-mentioned steps.
- Click Stop Recording and then upload video. Since the video is created in the app so you don’t have to worry about the file size.
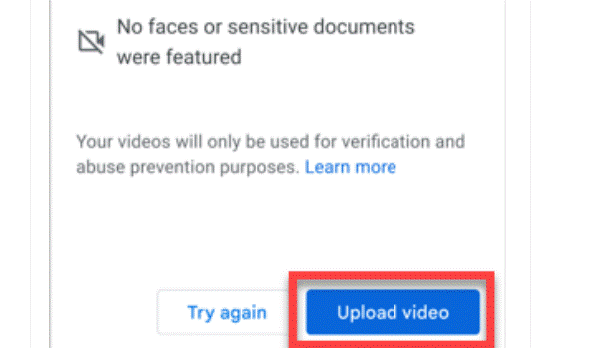
- Wait for the review. If your profile is verified, you will get a notification. If it is not verified, you will see the Get Verified Button pop up again.
Tips To Prepare For Video Verification
- Plan who will record the video and what will be shown in the video.
- Get a mobile device ready as you will be recording the video with the mobile device camera.
- Include relevant street signs and other businesses next door or across street. Don’t record unmarked roads or land as it will not help in determining the location of your business.
- Show your company’s branding on the walls or on the lobby.
- If your office is in a building with many floors and businesses, show the building’s business directory highlighting your company’s listing and suite number.
- If you are a service based business, show the tools/equipment that you use to perform your business. For example, a tree care company could show the specialized mowers, trimmers or wood chippers. A web designer could show the advanced software she uses to design the websites.
- Show your service vehicles with your company’s branding and logo.
- If you operate your business out of your home, show the street signs, your home with your street number on it, or your mailbox to prove your address.
- You can also show yourself unlocking the door and entering in. If you have a business license or any other licenses hanging on the wall, zoom in on them.
Some other ways of verification are by Live Video Call, Phone or Text, and Email. We will briefly discuss them too.
2. Verification Through Live Video Call
First of all, you must prepare for the live video call.
- Make sure that you are within the support hours for your region. Make sure that your mobile phone could join the call.
- Before the live call begins, make sure that you are at your business. Be prepared to show your current location by pointing camera to the outside signs like your street name. Plan to show your branding material or equipment, tools etc.
- During live video call, you must show your proof of management by recording the employee-only items or areas such as cash register, storage room or business equipment.
Once you are ready, start the call by going to your Business Profile.
- Click Get Verified then Video Call. Click Next.
- Pick your language.
- Start a call to talk to the next available representative.
- Once a representative joins you, use the camera of your mobile phone to show your business location, branding materials etc.
3. Phone or Text Verification
Make sure you answer your business phone number or receive texts. Interactive Voice Response (IVR) systems will not get the code. Follow these steps for instant verification:
- Go to your business profile.
- Click Get Verified then Phone or SMS.
- Answer the call or open the text with the code.
- Enter the code into your profile.
4. Email Verification
Follow these steps for email verification:
- Go to your Business Profile.
- Click Get verified, then Email.
- Follow the steps in the email to get verified.
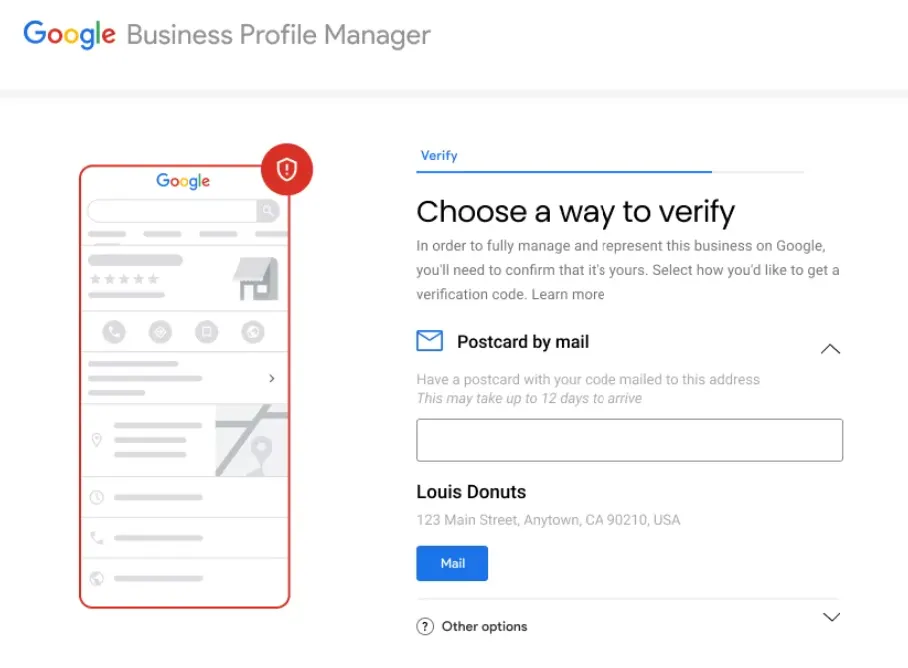
5. Postcard Verification
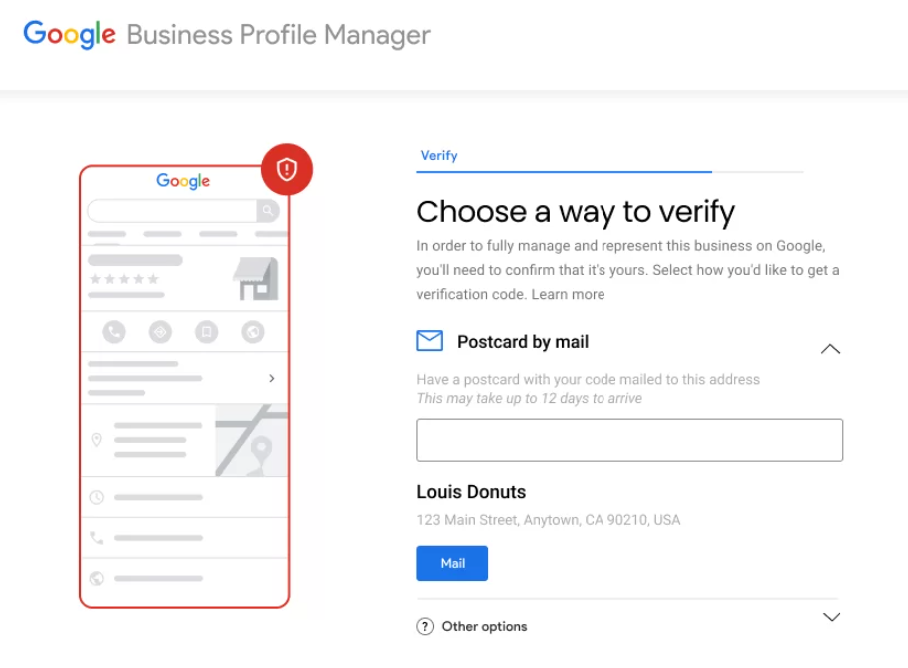
If you choose to verify by mail, you will receive a postcard with a verification code. Enter your unique code to confirm that your business is at the listed address. As you are waiting for the postcard, do not edit your business name, address or category.
You must not request a new code unless it is necessary. If you request a new code, the code on the postcard will be canceled and a new post card will be sent to you.
Your unique verification code is tied to the business and location you provided. The code requested for a current address doesn’t work if you change your business location.
Follow these steps to request your postcard.
- Go to your business profile. Click Get Verified then choose Postcard.
- Make sure the address is accurate.
- Click Request the postcard.
Once your postcard is received you can go to your Business Profile. Enter your 5-digit verification code from your postcard in the Code field. Click submit.
How to Claim Your Company on Google Maps?
You can claim a GMB account in just a few simple steps if it’s already listed on Google Maps:
Open Google Maps and search for your company name and select the relevant business name by clicking on it.
Click the option ‘Claim this business first’, then ‘Manage today’.
Click ‘own or manage another business‘ to select a different business.
Choose a verification method and follow the on-screen instructions.
#NSDSProTip
Yes, you will have to put your address into the GMB listing even if you only have a home office. But it will only be shown to the public if you told Google you have a physical location, customers should come to. And yes, Google is going to send you a snail mail postcard with the code, this is their way of ensuring that Oz is really behind the curtain (you = Oz, the business = curtain).
Free Download: Google My Business Checklist
Key Takeaway
An unclaimed and unoptimized GMB listing is like a vacant billboard on Madison Avenue. Don’t waste that important real estate. If you own a local business, you simply cannot afford to overlook the advantages that Google My Business may provide.
Be the company with an active, bustling, 5-star profile that makes competitors wish theirs looked as good!
Interested in learning more about basic and technical SEO? And how we can boost your business’s online presence to attract new (and better) customers? Contact us today to get started in the right direction.
Recommended Reading: What is a Google Business Account and Why do I need it?